customer.service@bizcardreader.com
|
customer.service@bizcardreader.com
|
 800.967.6527 408.733.2233
customer.service@bizcardreader.com
|
800.967.6527 408.733.2233
800.967.6527 408.733.2233
customer.service@bizcardreader.com
|
800.967.6527 408.733.22331. The driver files are on the BizCardReader CD which came with the scanner. If you do not have the CD, you can download the latest drivers from the web.
2. Follow this link to How to Install/Update the Scanner Driver for instructions on updating the scanner driver. Read the section on installing for Windows 8 & 7.
Using BizCardReader 900C on Windows 8 & 7:
The BizCardReader 900C scanner is a legacy device but is compatible with Windows 7; it will work with most Windows 8 & 7 PCs. However on some newer computers running Windows 8 & 7, the scanner may encounter a hardware incompatibility; it will not be able to calibrate or scan even though the control panel shows that the driver is installed.
The only option to resolve this is to try placing an external USB hub between the scanner and the computer; this may solve the problem. You can purchase an external USB hub from most electronic stores.
Follow the troubleshooting guide below if you are unable to install the BizCardReader scanner to work on your computer.
1. Ensure that the USB cable is properly and securely connected to your computer and to the scanner.
You must use the USB cable provided with the scanner or a compatible USB 2.0 (not USB 1.0) rated cable. The cable should not be longer than 4 feet. If you have to use a long USB cable, ensure that it is a high quality cable with good conductance.
2. Verify that the driver for the scanner has been successfully installed on your computer.
a. To do this, refer to the section on “Verify Successful Driver Installation”
b. For help on installing scanner drivers refer to the FAQ page under the section “Scanner Drivers”
3. After the scanner driver is successfully installed, you should perform scanner calibration.
Click here for help on “How to calibrate the scanner.”
4. After calibration, the scanner is fully installed on your computer.
You can now use the included “ScanToFile” application to perform a test scan.
5. If the scanned image is all blank (or black), then there may be a USB hardware incompatibility between the scanner and your computer. Please refer to “USB Port Incompatibility” for a solution to this problem.
Calibration Files
The scanner calibration files are stored to the following files –
Win 7 & Vista: \Users\Public\Public Documents\EDT
XP: Documents and Settings\All Users\Shared Documents\EDT
Filenames:
EDT600C.CLB, EDT900C.CLB
EDT901.CLB, EDTP960C.CLB
EDT1200.CLB, EDT1210.CLB etc
where the numbers represent the scanner model number.
Note: The scanner driver will prompt the user to calibrate the scanner when it is unable to access the calibration file. You should ensure that the user account has read/write access to the calibration file. If the prompt is constantly displayed for a user, then (i) delete the existing calibration file, and (ii) login as the user and perform a calibration. You can also refer to this link for more information on “How to disable the calibration prompt”
Twain Initialization Files
After each scan, the latest Twain scanner settings are saved to the following files –
A. BizCardReader 901, DX1210 Scanners:
Win 7 & Vista: \Users\Username\AppData\Roaming\EDT
XP: Documents and Settings\Username\Application Data\EDT
B. BizCardReader 600C, 900C, P960, DX1200 Scanners:
Win 7 & Vista: \Users\Username\AppData\Local\Temp
XP: Documents and Settings\Username\LocalSettings\Temp
Filenames:
EDT600C.INI, EDT900C.INI, EDT901.INI, EDTP960C.INI
EDT1200.INI,EDT1210.INI etc
where the numbers represent the scanner model number.
NOTES:
1. For the system to “remember” the Twain scanning parameters, ensure that you have
a. Read & Write access to the corresponding Twain initialization file.
b. The Twain initialization file does not get deleted by the OS or other program
2. To set/change the parameters in the ini file, the simplest method is to start a scan. In the scan dialog box, select the desired scanning options. Then perform a single scan with the selected parameters; this will cause the latest scan parameters to be automatically saved to the ini file.
Will the card scanner work on thin clients and/or remote desktops?
A number of our clients use our scanners to scan remotely using Citrix and other thin client platforms.
All our scanners are fully TWAIN complaint and will work with any platform that supports TWAIN scanners.
The key to determining if the scanners will work is to check if the remote desktop/platform supports redirection of USB TWAIN scanners. (Note that the capability to redirect standard USB devices such as disks and flash drives may not be sufficient to accommodate redirection of USB TWAIN scanners.)
Although many of our clients have been able to use our scanners on thin client and remote desktop platforms, we regret that we are unable to provide technical support for these platforms because of the diversity in the implementation of these environments.
We recommend that you purchase a unit of our scanner to test it out in your environment.
We have a 30 day full refund policy (less S/H) if the scanner does not work out to your satisfaction.
How do I use the ScanToFile application to scan and save images, or to calibrate the scanner?
ScanToFile is a utility program which allows you to scan, print, and save images to your hard disk. This program is included in BizCardReader Version 6.3 or higher. You can download the latest version by going to our download page.
How to start up ScanToFile
Install the BizCardReader application (version 6.3 or higher) into your computer.
Then click Start > All Programs > BizCardReader > ScanToFile
How to Scan and Save an Image
1. Start up ScanToFile
2. Select the scanner to use by clicking on File…Select Scanner.
3. Activate a scan by clicking on File…Scan, or just use the F1 key. This will pop up the Scanner User Interface.
4. Select the desired image/card size and other scan options in the Scanner User Interface.
5. Place a card on the scanner for scanning.
6. Click on the Scan button in the Scanner User Interface to start the scan. The scanner will scan the card and display the image.
7. To save the scanned image, click on File…SaveImage (or AutoSaveImage).
How to Calibrate the Scanner
Note: You should calibrate the scanner whenever any of the following occurs:
a. The colors of the scanned image do not look correct, or the scanned image is all black/dark.
b. You move the scanner to another computer, or switch to a different scanner on the computer.
1. Start up the ScanToFile application, and activate a scan. This will pop up the Scanner User Interface.
2. In the Scanner User Interface, click on the Calibrate button to begin the calibration process.
Calibration Sheet
If you need a new calibration sheet, you can download it from www.bizcardreader.com. Go to the download page and find the calibration sheet which corresponds to your scanner.
1. The System Help
The system help facility gives you comprehensive information on the use of all the different features of BizCardReader, including instructions on how to export the data to Outlook, and Excel, printing, searching, editing, and viewing the card database. To access the system help, start up BizCardReader and click on Help…Contents.
2. The Quickstart Manual
The Quickstart Manual is a pdf file which gives you general information on how to install and use the BizCardReader application, and the card scanner. It also includes instructions on how you can clean the scanner, if needed. To access the manual, click on the Windows Start button > All Programs > BizCardReader > QuickStart Guide.
BizCardReader is compatible with Microsoft Outlook, and you can transfer the card database to Outlook using the Outlook Synchronization feature.
BizCardReader is also compatible with Excel, Access, and all other applications which are capable of importing text data.
You can export the card database from BizCardReader to most other applications using the Automatic Export feature.
This feature saves the card database as a generic database text file which can be easily imported into other applications.
To use the Automatic Export to transfer the card database to your application:
1. Your application must be capable of importing an external text file.
2. Set up BizCardReader to automatically create the card database as an external text file.
3. Import the database into your application using your application’s import facility.
Link for more information on Automatic Export feature.
Transfer BizCardReader data to Outlook using Synchronization
Synchronization is a feature which enables you to seamlessly transfer all the information in the card database to another application.
To synchronize with Outlook:
1. Outlook should be installed on your system.
2. Start up BizCardReader and click on File > Synchronize Data > Setup.
3. Select Outlook as the destination application and click OK.
4. In the Transfer/Synchronization dialog box, click on the Outlook tab.
5. Select the destination folder.
6. Specify the synchronization options (see below) by clicking on the appropriate tabs. Then click OK.
7. To start synchronization, select File > Synchronize data > Go, or click on the Synchronize data icon.
Outlook Synchronization Options
The synchronization options control how data is transferred between BizCardReader and Outlook. To access the options,
1. Start up BizCardReader and click on File > Synchronize Data > Setup.
2. Select Outlook as the destination application and click OK
The available options are categorized under the different group tabs.
Outlook Tab
Destination database folder
Select or specify the name of the destination folder where the contact records are to be transferred. You can choose either the default contact folder or a sub-folder of the default contact folder. For Outlook 2000 and higher, you can choose the option ot select the folder at synchronization time.
Records to synchronize
All records in database – This will transfer all records in the currently opened BizCardReader database.
Current record only – This will transfer only the record currently displayed in the BizCardReader application.
Update Method Tab
This option determines how duplicate records are updated. Duplicate records are records that have been transferred into Outlook during a previous synchronization action. When a duplicate record is encountered during synchronization, you can
a. Skip it – do nothing and go on to the next record
b. Overwrite the record in Outlook with the data from BizCardReader
c. Overwrite the record in BizCardReader with the data from Outlook
d. Overwrite either the BizCardReader or Outlook record with the record that was most recently changed.
Note: Email, Memo and Notes fields are not updated in duplicate records.
Fields Tab
Select the fields to be used for synchronization by clicking on the check boxes.
Image Tab
If desired, the image of the business card stored in BizCardReader can be transferred to Outlook and will be placed in the notes section. One of the following 2 methods of image transfer can be used.
a. Linking the card image
This method links the card image as an external file to the Outlook contact. The advantage in this is that the Outlook database is smaller because it does not contain the card image data. The disadvantage is that the image will no longer be available when you delete the BizCardReader database or the corresponding image in the BizCardReader database.
b. Embedding the card image
This method embeds the card image to the Outlook contact. The advantage in this is that the image is always available with the Outlook contact even when you delete the BizCardReader database. The disadvantage is that the Outlook database becomes larger with each embedded image. At 400 dpi, an embedded line art (1 bit) card image takes up between 5K to 30K of space. An embedded photo (8 bit) image takes up between 100K – 300K of space.
Category Tab
This options in this group allows you to specify the categories for filing the contacts.
Notification Tab
These options determine the prompts and progress indicators to be displayed during the synchronization process. Select the options by checking the appropriate boxes.
Using the Automatic Export feature to transfer data to other applications such as Excel and Access
AUTOMATIC EXPORT
The Automatic Export feature allows you to transfer all the text information in the database to an export file in a format that is compatible with the selected target application. Each time the database is edited and the contents saved, the export file is automatically updated. This frees you from the tedium of having to manually export the database whenever you update the database contents.
To set up the automatic export feature, do the following.
1. Startup BizCardReader. Click File Menu and select Open option to open a database containing the information you want to export.
2. Select Automatic Export under File Menu. The Automatic Export dialog box will appear.
3. Select the (target) application format by clicking on the down arrow of the Application list box. If the application is not listed, you should select and use one of the Standard Text formats, or the Text and Image formats.
4. After you have selected the compatible application format, the lower edit box will display the name of the export file to which database contents will be saved. The name of the export file will be the name of the database followed by the “.csv” or “.txt” extension.
5. Note the name of the export file. Then click OK to confirm your selection or Cancel to quit.
After you have selected the target application and clicked OK, the system will automatically save or update the database contents to the export file whenever the current database is edited and saved. When you close the current database and open another database, the automatic export feature remains in effect and will save the newly opened database to a new export file as specified in step (4) above.
To disable the automatic export feature, select NONE in the Application list box of the Automatic Export dialog box.
To import the database into the target application, startup the application and use its import utility to read in the exported file obtained in step (4).
Export to EXCEL
To export the database to Microsoft Excel:
1. Start up BizCardReader and open the database which you want to export.
2. Create a an export file using the Automatic Export method and select one of the
Standard Text (with image) formats for the export.
This will create a “CSV” (comma separated values) export file which can be opened directly from Excel.
Export to ACCESS
1. Start up BizCardReader and open the database which you want to export.
2. Create an export file (e.g MyDatabase.CSV) using the Automatic Export method, and select one of
the Standard Text (with image) formats for the export.
3. Start up Access, and click on File… Get External Data (i.e. Import).
4. In the import selection box, select Text Files (i.e *.TXT, *.CSV) as the import file type.
5. Browse to the exported file MyDatabase.CSV and select it for import.
6. Continue with the import process until completion.
If you need additional help on importing a file, you should check the Microsoft Access Help by clicking on Help in the Access toolbar.
Calibrating the scanner
You should calibrate the scanner whenever any of the following occurs:
1. The colors of the scanned image do not look correct, or the scanned image is all black/dark.
2. You move the scanner to another computer, or switch to a different scanner on the computer.
Plug the scanner into the USB port of the computer, and install the scanner drivers if you have not already done so.
How to Calibrate:
Method 1
1. Plug the scanner into the USB port of the computer.
2. Open the scanner device properties:
WINDOWS 10: Open the Control Panel, and then click on Hardware and Sound -> Devices & Printers
WINDOWS 7: Click on Start -> Control Panel -> Hardware and Sound -> Devices & Printers
VISTA: Click on Start -> Control Panel -> Hardware and Sound -> Scanners & Cameras
XP: Click on Start -> Control Panel -> Printers and Hardware -> Scanners & Cameras
3. Right click on the BizCardReader/DuplexScan scanner icon and select Scan Properties.
4. Select the Calibration tab, and click Calibrate to start the calibration procedure.
Method 2
If you use this method, we recommend that you use the included ScanToFile application to perform the calibration. However, most other Twain compliant applications will also work.
1. Start up the Twain compliant Application (e.g. ScanToFile) which you use for scanning documents.
2. In the Twain Application:
(a) Select the BizCardReader/DuplexScan scanner.
(b) Enable the option (if any) to allow the scanner to display its Scanner User Interface.
3. Activate a scan to acquire the image a card from the scanner. The Scanner User Interface should pop up.
4. In the Scanner User Interface, and click on the Calibrate button to begin the calibration process.
Calibration Sheet
If you need a new calibration sheet, you can download it. Go to the download page and find the calibration sheet which corresponds to your scanner.
Troubleshooting
If calibration fails after several attempts, refer to the following document on How to resolve calibration failures.
Scanner calibration keeps failing
There are several possible reasons why calibration may fail. Refer to the list below for a solution.
1. The scanner calibration sheet is dirty or wrinkled.
Solution: Go to our “Download” page to download and print a new calibration sheet.
2. The system is unable to write to the calibration file.
Solution: Delete (if any) the old calibration file, and then try calibrating again. Follow this link to find where calibration files are stored on your system.
2. The USB cable is faulty or incorrect.
Solution: Use the USB 2.0 rated cable that came with the scanner; older USB 1.0 (lower speed) cables will not not work.
3. The scanner may need to be cleaned if dirt or residue stains the scanning glass after extended use.
Solution: Refer to our FAQ page on how to clean the scanner.
4. The scanner may be faulty.
Usually, if the scanner has been working on a computer for awhile and then suddenly stops working for no apparent reason, the most probable reason is that the scanner is faulty.
If you suspect that your scanner may be faulty, try installing the scanner on a different computer. If the same problem persists, the scanner is likely faulty. Please call customer service for replacement options if you have a faulty scanner.
5. USB Port Incompatibility
When you install the scanner on a computer for the first time, sometimes calibration keeps failing even though the scanner drivers seem to be properly installed. This may be due to a USB port incompatibility between the scanner and the computer.
The best way to resolve a port incompatibility is to use an external USB hub. Plug the external hub into the USB port of your computer, and then plug the scanner into one of the ports on the external hub. For more information on resolving USB port incompatibility, refer to our FAQ article <USB Port Incompatibility>
Note: If the scanner was previously working on the computer and after some use has suddenly stopped working, it is likely that the scanner itself is faulty, and not a compatibility issue. Please contact customer service about repair/replacement options.
Note: The scanner driver will prompt the user to calibrate the scanner when it is unable to access the calibration file. You should ensure that the user account is able to access the calibration file. Please refer to this link for more information on “Calibration Files”.
You can disable the calibration prompt by doing the following:
1. Make sure that you are using the latest scanner driver available from our website.
2. Startup the TWAIN compliant application that you normally use for scanning. If you do not have a Twain compliant application, you can use the ScanToFile program found in BizCardReader 6.3 (or higher). After you install BizCardReader 6.3, the ScanToFile program is found in Start…Programs…BizCardReader…ScanToFile.
3. Start up the scanning application, and select the appropriate card scanner. If you are using ScanToFile, click on File…Select Scanner, and then select the appropriate card scanner.
4. Activate a scan using the application; if you are using ScanToFile, click on File…Scan to activate a scan. The scanner TWAIN User Interface should pop up.
5. Click on the Calibrate button in the User Interface.
6. Select the “Do not remind me to calibrate” checkbox option, and then click the “OK” button.
7. Click on the Retry button if you want to proceed with calibration, or the Cancel button if you want to skip it.
Scanner Drivers are found in the Download section under Scanner Drivers
The easiest way to install or update the scanner driver is to allow your computer to search online in the Windows database for the most current drivers. This will automatically install the latest driver for your scanner. The list of the most current drivers can be found at this link: Scanner Drivers.
The scanner drivers are on the BizCardReader installation CD. If you do not have the CD, you can download the latest drivers from our website: Scanner Drivers.
WEB Download
You can download the latest drivers from the web; the required files will be copied by default to C:\TEMP\Driver900C (or Driver600C/901/DPX1200 etc). Note this driver folder.
First time installation
Before installing the scanner driver, you should log on to Windows as Administrator to ensure that you have sufficient privilege to install the driver.
General Installation Procedure
1. Insert the driver disk/CD into the disk/CD ROM drive.
2. Plug the Scanner into the system’s USB port.
3. The system will indicate that a new scanner hardware has been found. Press “Next” to continue.
4. Select “Search for the best driver (recommended)…” and click Next.
5. If prompted to specify a location for the driver search, select by checking the box for the CD ROM, and/or specify the folder where the downloaded driver files may be found.
6. Follow the on screen instructions and continue the installation procedure to completion.
A. Windows 7 and VISTA: Installing or updating the scanner driver
You can start the Windows driver install/update wizard for the scanner as follows:
a. Plug in the scanner into the USB port.
b. Click on Start in the Windows Task bar and open the Control Panel.
c. In Control Panel, click on “Hardware and Sound” and then “Device Manager” in the Devices section.
d. In the Device Manager, locate the scanner item either under Imaging Devices or Other Devices.
e. Right-click on the scanner item and select “Update Driver”.
f. If prompted, allow Windows to search online for the latest driver.
g. Follow the instructions from the driver wizard. If needed, specify the driver location, which is the CD ROM, or specify the folder where the downloaded driver files may be found.
B. Windows XP: Installing or updating the scanner driver
You can start the Windows driver install/update wizard for the scanner as follows:
a. Plug in the scanner into the USB port.
b. Click on Start in the Windows Task bar and open the Control Panel.
c. In Control Panel, click on Performance and Maintainence > System icon.
d. Next, open the Device Manager in the Hardware section.
d. In the Device Manager, locate the scanner item under Imaging Devices.
e. Select (right-click on the scanner item) Properties >Driver tab > Update Driver.
f. If prompted, allow Windows to search online for the latest driver.
g. Follow the instructions from the driver wizard. If needed, specify the driver location, which is the CD ROM, or specify the folder where the downloaded driver files may be found.
Verify Successful Driver Installation
Open the Device Manager as explained in A or B above. If the scanner driver is installed successfully, the name of the scanner will be displayed in the Device Manager under “Imaging Devices”, and there should not be any warning symbol or exclamation mark beside the scanner name. When you view the properties of the device, it should indicate that it is working properly.
Conflict with other USB devices
Some problems arise from conflicts with other devices on the USB. To resolve this, disconnect all other devices (and/or hubs), and plug the card scanner directly into the USB port of the computer.
Installing the Scanner on Windows Server 2008 R2
Using scanners in Windows Server 2008 R2 with TWAIN drivers may require the installation of Desktop Experience Pack.
Do the following:
Start Server Manager.
In the details pane, locate the Features Summary area, and then click Add Features.
In the Add Features Wizard, click to select the Desktop Experience check box, and then click Next.
Click Install.
After the Desktop Experience feature is installed, click Close to exit the Add Features Wizard, and then click Yes to restart the computer
Install the scanner driver.
Please refer to the following link for details on using Twain scanners on Windows Server 2008:
http://technet.microsoft.com/en-us/library/ee940564(v=WS.10).aspx
Removing all previous installations of the scanner driver.
This document describes how you can completely remove all earlier installations of the scanner drivers.
Windows 7:
1. Plug in the card scanner BCR901 (or DuplexScan1210, etc).
2. Go to the Control Panel, select System, and open up the Device Manager in the Hardware section.
In the Device Manager, locate the card scanner under Imaging Devices, and select “Uninstall driver.”
Check the “Delete the driver software…” option in the dialog box.
Follow the instructions to uninstall the driver.
Windows XP:
1. Plug in the card scanner BCR900C (or BCR901, BCR900C, DuplexScan1200, etc).
2. Go to the Control Panel, select System, and open up the Device Manager in the Hardware section.
In the Device Manager, locate the card scanner under Imaging Devices, and select “Uninstall driver.”
Check the “Delete the driver software…” option in the dialog box.
Follow the instructions to uninstall the driver.
3. Unplug the scanner from the system. DO NOT plug it in until you complete the steps below.
4. Start the Windows Search Utility and use the Advanced Search options to search file content.
Search in the “C:\WINDOWS\INF” folder for any file which contains (i.e. Search File Content)
the word “edt901” (or “edt900”, “edt960”, “edt1200” etc), where the number
corresponds to the scanner model number.
5. The result of the search will show a file of the form “oem???.inf”,where “???” is a number.
Delete this file. DO NOT delete any other file.
6. Reboot the computer.
How to adjust the scan image size to match the input card size
The size of the scanned image is adjusted by selecting the appropriate option in the application program which you use to scan the card. If the scanned image is too large with black bands around the image, you should enable the “AutoCrop” feature which should usually cut off the dark regions around the image.
1. BizCardReader application program
If you are using the BizCardReader 6.x application program which stores and organizes business cards, the image/card size is selected by clicking in the application menu: Settings –> Scanner –> Card Size. Enable the AutoCrop feature if desired.
2. ScanToFile application program
Please refer to the ScanToFile guide on how to scan and select the image/card size.
3. Other TWAIN compliant application program
If you are using a third party application program (such as medical or other client management software) to scan licenses or other cards, the image/card size to is normally set by selecting the appropriate option from within the application which you are using. To do this, you should do the following.
(a) Consult the third-party application manual how how to set the image/card size parameter. This may involve enabling the
scanner’s TWAIN “User Interface” (UI) option as you begin the scan procedure. When the scanner Twain UI is enabled, the UI will pop up when you perform a scan. You can then select the image/card size from the options in the UI. Normally, you should enable the “Crop Image” option in the UI to allow the system to automatically crop the scanned image to size.
For details on how to enable the Twain UI or set the image size, you should consult your third-party application manual or application support provider.
(b) As an alternative to the preferred method described in 3(a) above, you can try the following to set the scan size.
i. First, select the desired scan image/card size by using the ScanToFile application program to scan an image of the card.
ii. Then use the third party application to scan in the card as you normally would.
The scanned image is skewed, or the card is pulled in sideways.
It is possible that a support pin on the intake roller is broken, which results in cards being pulled in sideways.
You can unscrew and open up the scanner to check if that is the case.
Instructions on how to do this are are found on this FAQ page just below this topic, under how to clean the scanner.
If your unit needs to be repaired, please contact customer service at 800-274-2165.
The displayed image is too small
If the displayed scanned image is too small, it is usually because the Scan Resolution setting is too low; increase the Scan Resolution to about 200 or 300 DPI (Dots Per Inch).
Another reason why the image may appear small is because your software application displays the image in a small area of the screen. In this case, you can try enlarging the image display to get a clearer picture. Please consult your software application provider on how to do this.
How to Change the Scan Resolution
1. You can set the resolution by selecting the desired option in the Scanner User Interface which pops up when you start a scan. If the User Interface does not show up when you scan, you will need to consult your software application provider on how to select the scan resolution, or how to enable the Scanner User Interface to be displayed during scanning.
2. You can also select the scan resolution through the Scanner User Interface by using the ScanToFile Application.
The scanner requires no maintenance except for occasional cleaning. Dirt and other foreign particles from scanned cards and photographs may accumulate on the scanning glass and roller after an extended period of use. If there are noticeable dark lines in the scanned images, the scanner may need cleaning.
DuplexScan 1200 Cleaning Procedure
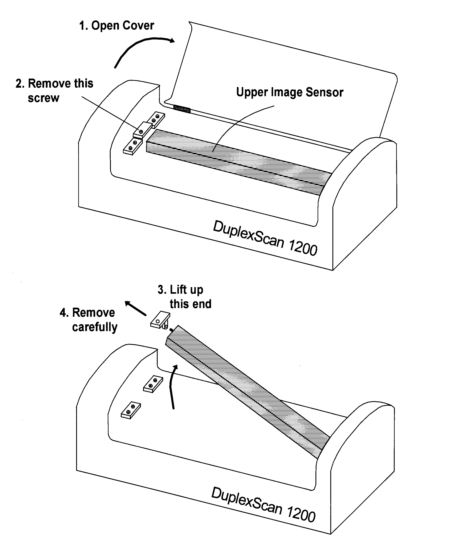
1. Lift up the top cover of the scanner.
2. Remove the SINGLE screw as shown. Use a small Philips head screwdriver. DO NOT remove any other screw.
3. Carefully lift up the left end of the upper imaging sensor.
4. Slide off the end retainer and remove the sensor from the right end pivot hole. DO NOT detach the white ribbon cable from the sensor.
5. Turn the upper sensor so that the glass plate faces up. Then rest the sensor on the scanner.
6. Wipe away dirt or other particles from the upper and lower glass plates and rubber rollers with a dry cotton cloth. Use a small amount of rubbing alcohol if needed.
7. Carefully re-assemble the scanner. Do not use excessive force when tightening the screws.
The scanner requires no maintenance except for occasional cleaning. Dirt and other foreign particles from scanned cards and photographs may accumulate on the scanning glass and roller after an extended period of use. If there are noticeable dark lines in the scanned images, the scanner may need cleaning.
BizCardReader 901 Cleaning Procedure
1. Turn the scanner over so that the bottom side faces up.
2. Remove the 2 screws located on the bottom of the scanner as shown. Use a small Philips head screwdriver.
3. Turn the scanner upright, and carefully pry open the top cover. Lift off the cover and place it next to the scanner base.
DO NOT DETACH the sensor wire
4. Wipe away dirt or other particles from the glass surface and rubber roller with a dry cloth or cotton swap. Use a small amount of rubbing alcohol if needed. For easier cleaning, you can press down to swivel and expose the glass surface.
5. Carefully re-assemble the top cover and screws. Do not use excessive force when tightening the screws.
How to clean the BizCardReader 900c, 600c, 300g scanners
The card scanner generally requires no maintenance except for occasional cleaning. Dirt and other foreign particles from scanned cards and photographs may accumulate on the scanning glass and roller after an extended period of use. If there are noticeable dark lines in the scanned images, the scanner may need cleaning.
BizCardReader 900C Cleaning Procedure
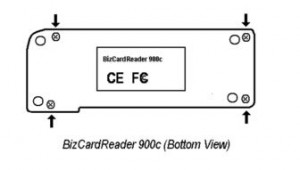
1. Turn the scanner over so that the bottom side faces up.
2. Remove the 4 screws located on the bottom of the scanner as shown. Use a small flat head screwdriver. DO NOT remove any other screw.
3. Turn the scanner upright and carefully lift off top cover.
4. Wipe away dirt or other particles from the glass plate and rubber roller with a dry cotton cloth. Use a small amount of alcohol if needed.
5. Carefully re-assemble the top cover and screws.
Note: Do not use excessive force when tightening the screws.
BizCardReader 600C Cleaning Procedure
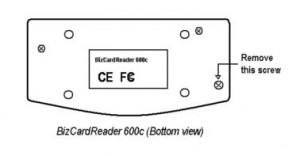
1. Turn the scanner over so that the bottom side faces up.
2. Remove the screw located on the bottom-right of the scanner as shown. Use a small flat head screwdriver. DO NOT remove any other screw.
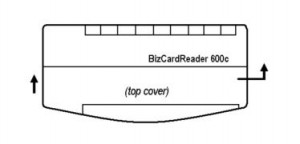
3. Turn the scanner upright and slide the top cover slightly to the right and lift up carefully.
4. Remove the black rubber roller by lifting it up from the roller slots.
5. Wipe away dirt or other particles from the glass plate and rubber roller with a dry cotton cloth. Use a small amount of alcohol if needed.
6. Replace the roller and carefully re-assemble the cover and screw.
Note: Do not use excessive force when tightening the screw.
BizCardReader 300G Cleaning Procedure
To clean the BizCardReader 300G card scanner, follow the same cleaning procedure (a-f) for BizCardReader 600C. The housing screw is similarly located on the bottom left of the scanner; you remove and replace the top housing in the same manner as for the model 600C scanner.
USB Port Hardware Incompatibility
On some computers, the card scanner may encounter a hardware incompatibility with the USB port of the computer.
The possible indications of a hardware incompatibility are:
a. The scanner does not work even though the Device Manager in the Control Panel indicates that the scanner is installed and working properly.
b. The scanner works only intermittently.
c. The scanner will not calibrate, or the calibration card does not move through the scanner during calibration.
d. The system hangs during calibration or scanning.
e. The scanned image is blank (or black) even after scanner calibration has been performed.
How to verify USB Port Incompatibility
1. If the scanner was previously working on the computer and after some use has suddenly stopped working, then it is likely that the scanner itself is faulty, and it is not a compatibility issue. Please contact customer service about repair/replacement options.:
2. You should try installing the scanner on a different computer to verify if it is a working unit. If it does not work on another PC, then it is likely a faulty scanner, and not a USB compatibility problem.
Solution:
The best solution to a USB port hardware incompatibility is to use an external (multi-port) USB hub.
1. Purchase an off-the-shelf standard External Multi-Port USB hub. A simple low-cost unit will do.
2. Plug the external hub into the USB port of your computer.
3. Plug the card scanner into one of the available USB ports on the external hub. Do no plug any other devices except the scanner into the external hub.
4. Install the scanner driver if prompted by the system.
Error message: “Function driver not specified…” on Windows 2000
Scanners affected: BCR900C and BCR600C only
Some machines running Windows 2000 may display the error message “Function driver not specified…”
To correct the problem:
1. Download the driver for the scanner from www.bizcardreader.com.
Go the the download page and download the Bizcardreader 900C (or 600C) driver file for the Windows 2000 OS: “bcr900c_drv_w2k.exe” (or “bcr600c_drv_w2k.exe”).
DO NOT USE THE UPDATED DRIVERS for Windows XP, Vista.
After you download the driver file, double click on it to run the exe file which
expands the driver files into the default folder: “C:\TEMP\Driver900C_W2K”
2. Check that the following 3 files exist on your windows 2000 system:
(1) c:\winnt\system32\drivers\usbscan.sys
(2) c:\winnt\inf\sti.inf
(3) c:\winnt\inf\usb.inf
If not, please consult your system administrator on how to obtain these files, and copy them to the above locations.
4. Remove previous driver files. Open Windows explorer and click on “Search” to search (i.e. “Look in”) the folder C:\WINNT\INF for any file (i.e. “*.*”) which contains the word or phrase “EDT900” (or “EDT600”).
Delete any file found as a result of this search. The file must be of the form “oem??.inf” (where “??” is a number). DO NOT delete any other file.
5. Unplug the scanner and reboot the computer. Then plug in the scanner. When prompted for the location of scanner driver, specify the driver location which should be the folder “C:\TEMP\Driver900C_W2K” as mentioned in step 1.
Proceed with the driver installation until the end.
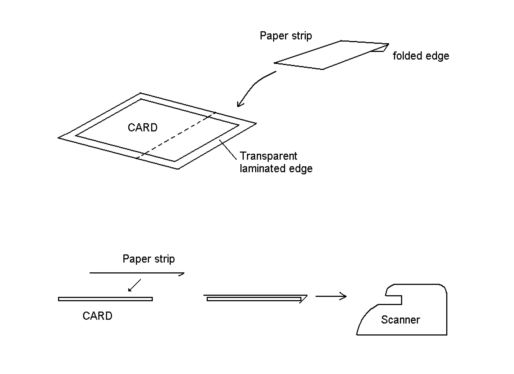
How to scan laminated cards with transparent edge using the BCR900C
Scanner affected: BCR900C only
When scanning a laminated card which has a wide transparent laminated edge, the scanner may not detect the presence of the card. This is because the wide transparent edge of the card interferes with the card sensor on the scanner. The sensor is located just under the scanning notch next to the SCAN button.
Solution:
Fold a strip of paper to cover the transparent edge on the (right) side of the laminated card where the sensor is located. Place the folded paper strip over the top of the card and insert the card into the slot for scanning. Make sure that the right edge of the card is covered by the paper strip, and the card fits under the notch next to the scan button.